Author Note
Jason Ward is a Fleet Equipment Specialist with 14 years of experience outfitting commercial vehicles across North America. He has installed over 3,500 vehicle tablet mounting systems for logistics, public safety, and field service fleets. Jason holds certifications from RAM Mounts and the National Institute for Automotive Service Excellence (ASE).
Introduction: The Critical Role of a Proper Mount
A rugged tablet without a proper mount is not a productivity tool—it’s a hazard. In a moving vehicle, an unsecured tablet becomes a projectile during sudden stops, a distraction during critical driving moments, and a source of driver frustration when it shifts out of reach or view.
For logistics fleets, field service operations, public safety vehicles, and tradespeople who rely on mobile computing, the mounting system is just as important as the tablet itself. A well-chosen mount keeps the device accessible, stable, and safe. A poorly chosen mount—or worse, no mount at all—compromises driver safety, reduces operational efficiency, and leads to damaged equipment.
This guide covers five proven mounting solutions for installing rugged tablets in vans, trucks, and commercial vehicles. Whether you are outfitting a single work van or a fleet of 200 vehicles, these approaches will help you select the right mounting system for your specific application.
Before You Mount: Key Considerations
Before selecting a mounting solution, several factors will determine which approach works best for your vehicle and use case.
Vehicle Type and Cab Layout
A full-size cargo van has different mounting opportunities than a pickup truck cab or a semi-truck sleeper. Evaluate available mounting points: seat bolts, dashboard structure, floor pans, and existing consoles.
Tablet Size and Weight
Larger rugged tablets (10 to 13 inches) require more robust mounting systems than smaller 7-inch devices. The weight of the tablet, plus the docking station if used, must be supported securely.
Driver Ergonomics
The tablet should be positioned where the driver can view and interact with it without excessive head movement or reaching. The ideal position keeps the tablet within the driver’s peripheral vision and within comfortable arm’s reach while maintaining clear visibility of the road.
Charging and Connectivity Requirements
Consider whether the mount needs to integrate charging. Many fleet applications require continuous power delivery through a docking station or powered mount that connects to the vehicle’s electrical system.
Security Needs
If tablets are left in vehicles overnight or in unattended areas, consider mounts with locking mechanisms or quick-release features that allow the tablet to be removed and secured.
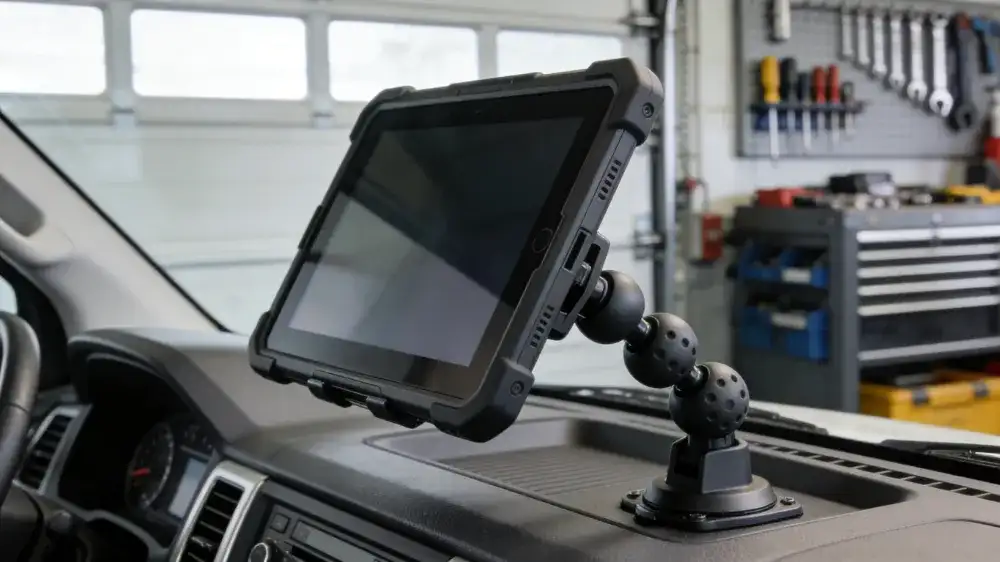
Mounting Solution 1: RAM Mount Systems – The Industry Standard
RAM mount (Round-Arm-Mount) systems have earned their reputation as the industry standard for vehicle tablet mounting. The system’s modular design—based on rubber ball-and-socket joints, adjustable arms, and device-specific cradles—provides unmatched flexibility and vibration dampening.
How RAM Mounts Work
The RAM system consists of three primary components: a mounting base that attaches to the vehicle, an arm that connects the base to the device holder, and a device-specific cradle or mounting plate. The rubber ball-and-socket joints allow the arm to be positioned and tightened at virtually any angle.
Best Applications for RAM Mounts
RAM mounts excel in applications where flexibility is paramount. Delivery vans with multiple drivers benefit from adjustable arms that accommodate different seating positions. Public safety vehicles require the vibration-dampening characteristics that RAM mounts provide. Service trucks benefit from the ability to reposition the tablet for different tasks.
Installation Considerations
RAM mounts offer multiple base options. Seat bolt bases slide under existing seat mounting bolts without drilling. Floor bases attach directly to the vehicle floor pan. Dashboard bases use adhesive or screw mounting to secure the system. Clamp bases attach to tubular structures like roll bars or center consoles.
Pros and Cons
The primary advantages of RAM mounts are flexibility, vibration dampening, and the extensive ecosystem of compatible components. The modular design means components can be mixed and matched across vehicles and devices. The primary disadvantage is the exposed arm and joints, which can collect dust and debris in dirty work environments. Some users also find the multiple adjustment points require periodic retightening.
Best For
Fleets with multiple driver rotations, vehicles with varying interior layouts, applications requiring frequent device repositioning.
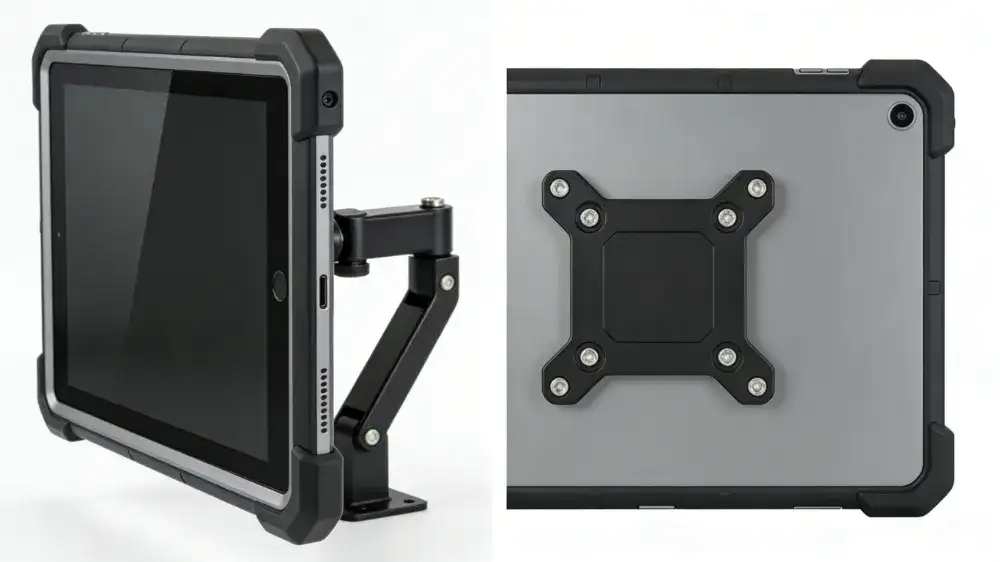
Mounting Solution 2: VESA Mount Systems – The Clean, Integrated Approach
VESA mount (Video Electronics Standards Association) systems take a different approach. Rather than using a universal cradle, VESA mounts attach directly to the mounting holes on the back of rugged tablets or docking stations. This creates a cleaner, more integrated appearance with fewer exposed components.
How VESA Mounts Work
Most rugged tablets and docking stations incorporate the AMPS pattern (Advanced Mobile Phone System) or standard VESA mounting holes on the back of the device. A VESA mount consists of a plate that bolts directly to the tablet or dock, attached to an arm or pedestal that mounts to the vehicle.
Best Applications for VESA Mounts
VESA mounts are ideal for permanent installations where the tablet or dock remains in the vehicle. Work vans with dedicated drivers benefit from the clean, professional appearance. Utility trucks where the tablet is mounted on a pedestal between the seats work well with VESA mounting. Fleet vehicles with standardized equipment appreciate the consistent mounting position.
Installation Considerations
VESA mounting requires that the tablet or docking station have compatible mounting holes—most rugged tablets do. The mount arm attaches to the vehicle using similar base options as RAM systems: seat bolt, floor, or dashboard mounting. Because the tablet is bolted directly to the mount, there is no cradle to adjust for different devices.
Pros and Cons
The clean appearance and minimal exposed hardware are significant advantages. VESA mounts also tend to have fewer moving parts than ball-and-socket systems, reducing maintenance requirements. The primary disadvantage is reduced flexibility—the mounting position is fixed, and adjusting the tablet angle requires loosening bolts rather than repositioning a ball joint. VESA mounts also lack the vibration-dampening rubber balls that RAM systems provide.
Best For
Dedicated driver vehicles, permanent installations, applications where a professional appearance matters, fleets using standardized tablets across all vehicles.
Mounting Solution 3: Seat Bolt and Floor Mounts – Maximum Stability
For heavy-duty applications where stability is the highest priority, seat bolt mount and floor mount systems provide the most secure attachment points available. These mounts use existing vehicle structure—either the bolts that secure the driver or passenger seat to the floor, or direct attachment to the vehicle floor pan.
How Seat Bolt Mounts Work
Seat bolt mount systems consist of a metal plate with a mounting post that slides under one or more of the seat’s existing attachment bolts. The seat bolts are removed, the mount plate is positioned, and the bolts are reinstalled, securing the mount between the seat base and the vehicle floor. No drilling is required.
How Floor Mounts Work
Floor mount systems attach directly to the vehicle floor pan, typically using bolts through the floor with reinforcement plates underneath. This approach provides the most rigid mounting possible but requires drilling holes in the vehicle floor.
Best Applications
These mounting solutions excel in heavy-duty applications where the tablet must remain absolutely stationary. Public safety vehicles (police, fire, EMS) require the stability that seat bolt and floor mounts provide. Off-road service vehicles that encounter severe vibration benefit from the rigid mounting. Long-haul trucks where the tablet serves as a primary dispatch interface work well with pedestal-style floor mounts.
Installation Considerations
Seat bolt mounts are among the easiest to install—they require only removing and reinstalling seat bolts, which can typically be done with hand tools in under 30 minutes. Floor mounts require more installation time, including drilling, reinforcing, and sealing to prevent water intrusion. Both approaches require verifying that the mount does not interfere with seat adjustment or driver entry and exit.
Pros and Cons
The stability and security of seat bolt and floor mounts are unmatched. They provide a solid foundation that does not shift over time. The primary disadvantage is the permanent nature of the installation. Seat bolt mounts are less intrusive than floor mounts but still leave the mounting post in place when the tablet is removed. Floor mounts require drilling, which may be undesirable for leased vehicles or resale considerations.
Best For
Public safety vehicles, off-road service vehicles, heavy-duty fleet applications, vehicles with severe vibration environments.
Mounting Solution 4: Dashboard and Console Mounts – The Low-Profile Option
When a clean, low-profile installation is desired—or when seat bolt and floor mounts are impractical—dashboard mount and console mount systems provide alternatives that position the tablet within the driver’s natural line of sight.
How Dashboard Mounts Work
Dashboard mount systems use adhesive pads, suction cups, or screw mounts to attach to the vehicle’s dashboard surface. Adhesive mounts use industrial-grade automotive tape that bonds to the dashboard. Suction mounts attach to smooth windshield or dashboard surfaces. Screw mounts require drilling into the dashboard structure for permanent attachment.
How Console Mounts Work
Console mount systems attach to the vehicle’s center console—the structure between the driver and passenger seats. These mounts often integrate with existing console components or replace sections of the console with custom mounting plates.
Best Applications
Dashboard and console mounts are ideal for vehicles where seat bolt or floor mounts are impractical. Passenger vans with limited floor space, pickup trucks where the center console provides a natural mounting location, and vehicles with complex under-seat equipment benefit from these approaches.
Installation Considerations
Adhesive dashboard mounts are the least invasive but must be installed on clean surfaces with proper curing time for the adhesive to bond fully. Suction mounts offer temporary installation but are not recommended for permanent fleet applications due to potential release over time. Screw-mounted dashboard mounts provide the most security but require drilling into the dashboard, which may void warranties or affect resale value.
Pros and Cons
The primary advantage of dashboard and console mounts is the ergonomic positioning—the tablet sits at a natural viewing angle, reducing driver head movement. The installation is less invasive than floor mounts for adhesive options. The disadvantages include limited stability compared to seat bolt or floor mounts, potential for dashboard damage with screw mounts, and reduced compatibility with docking station that add weight.
Best For
Pickup trucks with center console mounting options, passenger vans with limited floor space, applications where a low-profile installation is preferred.
Mounting Solution 5: Headrest and Seatback Mounts – Passenger-Facing Applications
For applications where the tablet is intended for rear-seat passengers rather than the driver—or for passenger vans where multiple devices are needed—headrest mount and seatback mount systems provide secure attachment to the vehicle’s seats.
How Headrest Mounts Work
Headrest mount systems clamp around the metal posts that secure the headrest to the seat. The mount attaches between the headrest and the seat back, providing a stable platform for the tablet without drilling or permanent modification.
How Seatback Mounts Work
Seatback mount systems attach to the back of the front seat, providing a tablet position for rear-seat occupants. These mounts may use straps, clamps, or screw attachments depending on the seat design.
Best Applications
These mounting solutions are ideal for passenger vans, shuttle vehicles, and any application where tablets are used by rear-seat passengers rather than the driver. They are also used in some fleet applications for training vehicles or for devices used by crew members in the passenger seat.
Installation Considerations
Headrest mounts are among the simplest to install—they slide over the headrest posts and tighten with set screws. No tools are typically required. Seatback mounts may require more installation time depending on the attachment method. Both approaches allow removal when not needed.
Pros and Cons
Headrest and seatback mounts offer non-permanent installation that does not modify the vehicle. They are ideal for vehicles where the tablet is not needed for driver functions. The disadvantages include limited stability compared to rigid-mounted systems and the potential for interference with rear-seat passenger space.
Best For
Passenger vans, shuttle vehicles, crew-cab trucks with rear-seat passengers, training and demonstration vehicles.
Mounting Hardware: Understanding the Components
Regardless of which mounting solution you choose, understanding the components will help you select the right configuration.
Ball and Socket Mount
The core of RAM-style systems, a rubber ball and socket joint provides 360-degree rotation and vibration dampening. The ball is typically 1 inch, 1.5 inches, or 2.25 inches in diameter, with larger balls providing greater load capacity.
VESA Plate
A flat plate that matches the VESA or AMPS mounting pattern on the back of the tablet or docking station. Standard patterns include 75mm x 75mm, 100mm x 100mm, and the 2-hole AMPS pattern.
Docking Station
A docking station provides both physical mounting and electrical connectivity. The tablet locks into the dock, which provides charging, antenna connections, and integration with vehicle systems. Docking stations typically include quick release mechanisms for tablet removal.
Extension Arm
An arm that extends the mount from the base to the tablet, allowing positioning away from the mounting point. Arms come in various lengths, from 3 inches to 12 inches or more.
Pedestal
A vertical post that raises the tablet to the desired height. Pedestal mount systems are common for floor mounts where the tablet needs to be positioned at steering wheel height.
Grommet Mount
A grommet mount passes through a pre-existing hole in the dashboard or console, providing a clean attachment point without exposed hardware.
Charging and Power Integration
A mount is only half the solution. For fleet applications, continuous power delivery is essential.
Powered Mounts
Some mounting systems incorporate power directly into the mount itself. Docking station with integrated charging eliminate separate power cables. The tablet connects to power automatically when inserted into the dock.
Ignition Sensing
Ignition sensing capability allows the tablet to power on when the vehicle starts and enter sleep mode when the vehicle turns off. This preserves vehicle battery and ensures the tablet is ready when the driver is.
Cable Management
Clean installations require proper cable management. Mounting systems with integrated cable channels or clips keep power cables organized and protected from damage. Cables should be routed away from moving parts, sharp edges, and areas where they could interfere with driver controls.
Power Conditioning
Vehicle electrical systems produce voltage spikes and fluctuations. Power management components that provide power conditioning protect the tablet from damage and ensure reliable operation.
Vehicle-Specific Recommendations
Cargo Vans (Ford Transit, Mercedes Sprinter, Ram ProMaster)
Seat bolt mounts are the preferred solution for cargo vans. The driver seat bolts provide a solid attachment point, and the mount can position the tablet between the driver and passenger seats or alongside the driver. Floor mounts are also viable but require drilling.
Pickup Trucks (Ford F-Series, Ram, Chevrolet Silverado)
Center console mounts offer the best ergonomics for pickup trucks. Dashboard mounts on the center stack are another option. For trucks with bench seats, seat bolt mounts are the preferred approach.
Semi-Trucks (Class 8 Trucks)
Pedestal floor mounts or dashboard mounts are common in semi-trucks. The mounting position should not interfere with the steering wheel or driver controls. VESA mounts on the dashboard provide a clean installation.
Utility Trucks and Service Vehicles
Seat bolt or floor mounts are recommended for vehicles that operate off-road or on rough roads. The additional stability prevents device movement during heavy vibration.
Passenger Vans
For driver-facing applications, seat bolt mounts work well. For passenger-facing applications, headrest mounts provide a secure solution for rear-seat tablets.
Installation Best Practices
Plan Before Drilling
Before drilling any holes, test the mounting position with the tablet in place. Verify that the tablet does not interfere with the steering wheel, airbag deployment zones, or driver controls. Ensure the tablet remains visible without blocking the driver’s view of the road.
Use the Right Tools
Proper installation requires the correct tools. For seat bolt mounts, a torque wrench ensures bolts are tightened to manufacturer specifications. For electrical connections, a multimeter verifies proper power connections.
Secure All Fasteners
Use thread-locking compound on bolts that may be subject to vibration. Periodically inspect and retighten fasteners, especially during the first month after installation.
Protect Wiring
Route power cables away from moving parts and sharp edges. Use loom or conduit to protect wiring where it passes through panels or near moving components.
Consider Professional Installation
For fleet installations, consider professional installation services. Proper installation ensures safety, reliability, and warranty compliance. Many vendors offer installation services or certified installer networks.
Common Installation Mistakes to Avoid
Mounting in Airbag Deployment Zones
Mounting the tablet where an airbag could strike it during deployment is dangerous and potentially fatal. Never mount tablets directly in front of passenger airbags or in areas where an airbag would contact the device.
Blocking Driver Controls
The tablet should not block access to the steering wheel, gear selector, climate controls, or any vehicle controls needed for safe operation.
Insufficient Fastener Torque
Under-tightened fasteners can loosen over time, allowing the mount to shift. Over-tightened fasteners can damage vehicle components or strip threads.
Neglecting Cable Management
Loose cables can interfere with driver controls, become damaged, or create trip hazards. Proper cable management is essential for safety and reliability.
Choosing the Wrong Mount for the Application
A suction-cup mount may work for occasional use but will not survive daily fleet operations. Select a mount rated for the intended application.
Conclusion: Selecting the Right Solution
The best mounting solution depends on your specific vehicle, tablet, and operational requirements.
For maximum stability and security: Seat bolt or floor mounts with a VESA or RAM system provide the most secure installation. These are recommended for public safety, off-road, and heavy-duty fleet applications.
For maximum flexibility: RAM mount systems allow repositioning and accommodate multiple drivers and vehicle types. These are ideal for mixed fleets and applications where the tablet may be used by different operators.
For clean, professional installations: VESA mount systems provide an integrated appearance with minimal exposed hardware. These work well for dedicated-driver vehicles and permanent installations.
For passenger-facing applications: Headrest and seatback mounts offer secure installation without vehicle modification.
For leased vehicles or temporary installations: Seat bolt mounts and adhesive dashboard mounts provide secure attachment without drilling.
Regardless of which solution you choose, prioritize driver safety, proper installation, and integration with charging and power management systems. A properly mounted tablet becomes an invisible productivity tool that enhances safety and efficiency. An improperly mounted tablet becomes a hazard that undermines both.

Frequently Asked Questions (FAQ)
Q1: What is the difference between RAM mount and VESA mount for truck installations?
A: RAM mount systems use a modular ball-and-socket design with rubber balls that provide vibration dampening and unlimited positioning flexibility. They consist of three components: a base, an arm, and a device-specific cradle. VESA mount systems attach directly to the tablet’s mounting holes (75mm x 75mm or 100mm x 100mm) using a plate that bolts to the device or docking station. VESA mounts offer a cleaner, more integrated appearance but less positioning flexibility than RAM systems.
Q2: Can I mount a tablet without drilling holes in my van?
A: Yes. Seat bolt mounts slide under existing seat bolts, requiring no drilling. Adhesive dashboard mounts use industrial-grade automotive tape. Headrest mounts clamp onto headrest posts. These options provide secure mounting without permanent vehicle modification.
Q3: What is the best mounting position for a tablet in a work van?
A: The best position places the tablet within the driver’s peripheral vision and comfortable arm’s reach without blocking the steering wheel, controls, or forward visibility. For cargo vans, mounting alongside the driver’s seat or between the driver and passenger seats works well. For pickup trucks, center console mounting offers excellent ergonomics.
Q4: Do I need a docking station or can I just use a mount?
A: A docking station is recommended for fleet applications where the tablet is used daily. Docking stations provide secure retention, continuous charging, antenna connections for improved GPS and cellular reception, and ignition sensing that powers the tablet on and off with the vehicle. A mount alone holds the device but does not provide power or connectivity.
Q5: How do I ensure the tablet mount doesn’t interfere with airbag deployment?
A: Never mount tablets directly in front of or in the deployment path of airbags. Airbag deployment zones vary by vehicle but generally include the dashboard on the passenger side and the steering wheel center. Mount tablets away from these areas. Consult the vehicle owner’s manual for airbag locations. Professional installers can verify safe mounting locations.
Q6: What is ignition sensing and why is it important?
A: Ignition sensing detects when the vehicle is running and manages the tablet’s power state accordingly. The tablet powers on when the vehicle starts, operates while driving, and enters sleep mode or shuts down when the vehicle turns off. This preserves the vehicle battery, ensures the tablet is ready when the driver is, and prevents device failure from parasitic drain.
Q7: Can I use a suction cup mount for a rugged tablet in a commercial vehicle?
A: Suction cup mounts are not recommended for permanent fleet installations. While suitable for occasional use, suction cups can release over time due to temperature changes, vibration, and UV exposure. For commercial vehicles, mechanical mounts using seat bolts, floor attachment, or dashboard screws provide the security required for daily operations.
Q8: How do I mount a tablet in a truck with a bench seat?
A: For bench seat vehicles, floor mounts with a pedestal are the best option. The pedestal mounts to the floor between the driver and passenger positions, raising the tablet to an ergonomic height. Seat bolt mounts may also be used on the driver or passenger seat bolts, positioning the tablet alongside the seat.
Q9: What is the AMPS pattern and why does it matter?
A: The AMPS pattern (Advanced Mobile Phone System) is a standard mounting hole pattern measuring 30mm x 38mm (approximately 1.18 inches x 1.5 inches). Most rugged tablets and docking stations incorporate this pattern or VESA patterns (75mm x 75mm, 100mm x 100mm). Verifying that your mount matches your tablet’s mounting pattern ensures compatibility.
Q10: How often should I inspect my vehicle tablet mount?
A: Inspect mounts monthly during the first three months after installation, then quarterly thereafter. Check all fasteners for tightness, inspect the tablet retention mechanism for wear, and verify that cables remain secured and undamaged. Vehicles operating off-road or in severe vibration environments may require more frequent inspection.
Latest Content
- From Chaos to Control: How a Logistics Company Achieved 20% Efficiency Gains with the Waysion V7S Terminal
- How to Choose a Truck Tablet for Fleet Management: 2026 Selection Guide
- 2026 Best Rugged Tablets with GPS for Field Work: Waysion Comprehensive Guide
- MDT Select Bus Route: A Guide for Drivers on Efficient Route Selection and Optimization
- Why System Integrators Still Choose Proven Hardware Partners in 2026
Tags: Commercial Vehicle Mounts, Installation Guide, Rugged Tablet Mounting, Truck Van Mount Solutions, Vehicle Tablet Mount